

Welcome to Streamlabs Talk Studio! Talk Studio is a web-based live streaming platform that allows you to invite guests, share your screen and go live instantly! Below are minimum requirements provided as well as general setup for both Host and Guest.
Go Live Requirements
Talk Studio has limited HD capabilities and relies on a stable internet connection. The platform will adjust video quality based on your network connection and upload speed. If your connection is unstable HD quality may not be possible. Test your broadcast strength or see below for our minimum Go Live requirements:
- Internet connection (wire/cable preferred)
- Upload Speed = 5 to 7 Mbps (for 720p output) or 20 Mbps or greater (for 1080p output)
- Google Chrome browser (Windows/Mac/Android) or Safari (iOS)
Browser Setup
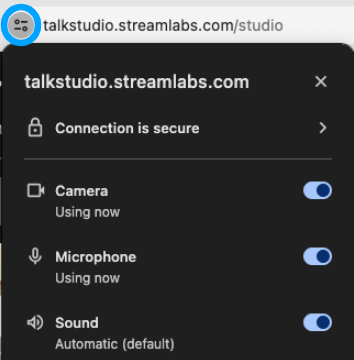
When first visiting Talk Studio, allow your browser to recognize your camera & microphone or click the settings icon located next to your browser’s address bar:
Camera/Webcam
Select your preferred Video Input/Output by locating & clicking the up-arrow next to your Stop Video button.
 Stop Video button.png)
Microphone
Select your preferred Audio Input/Output by locating & clicking the up-arrow next to your Mute button.
 Mute button.png)
All camera feeds including screen-shares will be displayed on the left side of your Talk Studio.
 Left Navbar.png)
- Add Guest. Send an invitation to a guest/speaker to join your live stream via website URL.
![]()
- Show on Stream. Press to display camera feeds or click again to Hide on Stream. (*microphone affected per camera feed.)
 Show on stream.png)
- Spotlight. Displayed as a double-arrow icon, your spotlight button keeps your microphone on while sharing your screen or camera feed in fullscreen. Double-click the window you want to spotlight or locate and click the double-arrow icon per camera feed.
 Spotlight.png)
- Team. Send an invitation to a friend(s) to join your team as your Co-host by pressing Invite Member.
 Team > Invite Member.png)
Setting Up Your Destinations
Your social media accounts are defined as your destinations on Talk Studio. Press Add Destination to link your accounts from your Destinations page. (For instructions, please visit: Streaming Destinations)
 Destinations.png)
Studio Settings
Acquaint yourself with your new Talk Studio. On the right of your studio, you have additional personalized studio options & settings available.
 Account icon.png)
Account - Your account icon allows you to visit your Account Settings which include: Billing, Destinations, Broadcasts & Recordings, Stream Forwarding, Referrals, or our Contact page.
 Rightside Studio.png)
- Chat - Reply to viewers or guests through your chat window. (See Chat for details.)
- Schedule - Schedule your stream in advance. (See Scheduling for details.)
- Design - Add your own logo/watermark, studio background, or add an overlay.
- Styles - Edit your font, name tag, brand color, or theme/layout.
- Text - Add a banner, ticker, or teleprompter.
- Video - Add a virtual background, blur or set up videos as your intro or outro.
- Settings - Enable custom live stream settings or recording options.
- Apps - For chat moderation, tips, or alert notifications. (see Integrated Apps for details.)
Host & Guest Setup
Talk Studio is web-based, meaning you will need to log in to your account using a computer and browser. Please read below for general information on both host & guest setup.
Preferred Browsers are:
- Google Chrome (PC/Mac/Android) or Safari (iOS)
Guest invites per stream (including Co-Hosts):
- Free users - Up to 1 Guest
- Standard users - Up to 5 Guests
- Pro users - Up to 24 Guests/15 Guests on-screen
Record Your Livestream
Click Settings (Shift+G) from your Talk Studio and select a record option under Output:
 Settings > Output.png)
- Record: Includes a complete recording and audio-only downloadable file.
- Local Recording: Includes separate tracks (audio/video) available for download per participant.
How To End Your Live Stream
Hosts - When you have finished your live stream:
 End Stream button.png)
At the bottom of your studio, please make sure to press the End Stream button. This will ping our servers that you have completed your broadcast.
(*If the End Stream button is not pressed, your broadcast will remain LIVE.)
Guests - When you have finished your live stream:
 Leave button.png)
At the bottom of your studio, please make sure to press the Leave button. This will ping our servers that you have completed your broadcast.
(*If the Leave button is not pressed, your broadcast will remain LIVE.)
How To Accept a Guest Invitation Link
The host will send you a website URL. (*eg. https://talkstudio.streamlabs.com/BxF4mrfzxxy)
Please copy & paste your invitation link into a new Google Chrome browser window (PC/Mac/Android) or Safari browser window. (iOS) (*Please do not accept the guest invitation URL through a third-party messenger service/app.)
Things To Keep In Mind
- If you have many browser windows opened, to avoid CPU overuse please close all applications before pressing Go Live on Talk Studio.
- Please disable VPN extensions if used, as this will affect your live stream and video quality.
- Please disable all browser extensions as this may also affect your experience.
- Inviting Guests - When sending a guest invitation link, please ask guests to copy & paste the URL/link into a new browser window.
- If guests wish to screen share during your live broadcast, please ask them to visit Screen Sharing for setup before accepting a guest invitation link.
- Record/Local Record - To make sure you are able to download your broadcast after your live stream has ended, please ensure your guests press the Leave button. They will be prompted from their Talk Studio that their broadcast has been successfully uploaded and safe to close their browser window.
- Local recording - If enabled, please ensure guest(s) do not accept your invitation through a mobile device. (iOS/Android) *Mobile devices are not supported.